UCSF ChimeraX: Structure Visualization and Analysis
Boris Steipe
|
Expected Preparations:
|
|||||||
|
|
|||||||
| Keywords: UCSF ChimeraX; Structure visualization; Structure analysis | |||||||
|
|
|||||||
|
Objectives:
This unit will …
|
Outcomes:
After working through this unit you …
|
||||||
|
|
|||||||
|
Deliverables: Time management: Before you begin, estimate how long it will take you to complete this unit. Then, record in your course journal: the number of hours you estimated, the number of hours you worked on the unit, and the amount of time that passed between start and completion of this unit. Journal: Document your progress in your Course Journal. Some tasks may ask you to include specific items in your journal. Don’t overlook these. Insights: If you find something particularly noteworthy about this unit, make a note in your insights! page. |
|||||||
|
|
|||||||
|
Evaluation:
|
|||||||
Contents
This unit introduces the molecular viewer UCSF ChimeraX, starts you off on a routine to practice stereo viewing of molecular models, and teaches how to use ChimeraX to solve a number of common visualization and analysis tasks.
Molecular graphics: UCSF ChimeraX
To view molecular structures, we need a tool to visualize the three dimensional relationships of atoms. A molecular viewer is a program that takes 3D structure data and allows you to display and explore it. For a number of reasons, I use the UCSF ChimeraX viewer for this course1:
- ChimeraX is open, and free for academia;
- It creates very appealing graphics;
- It is under ongoing development and is well maintained;
- There is a very helpful and professional help-list available;
- It provides an array of useful utilities for structure analysis;
- besides an intuitive, menu driven interface, ChimeraX can be scripted via its command line, or even programmed via its in-built python interpreter;
- and – a remote-control option allows to script ChimeraX display and analysis directly from R.
ChimeraX: First steps
Task…
Installation
- Access the ChimeraX homepage and navigate to the Download section.
- Find the the newest version for your platform in the table and click on the file to download it. (Previous versions for older operating systems are available.)
- Follow the instructions to install ChimeraX.
First tutorial
- The ChimeraX User Guide site has a set of associated tutorials. Opening the tutorials directly in ChimeraX – from the menu item Help ▹ Tutorials – is the best way to work with them.
- Open ChimeraX and select Help ▹ Quick Start Guide. Work through the “Example Atomic-Structure Commands” section.
- Next, explore the 1BM8 structure:
- In the Models pane (open it via the Tools Menu if it is not open), click on 2bbv to select it, and click the Close button to remove the model. There should now be no model left.
- Type
open 1bm8in the commandline to load the 1BM8 structure from the PDB. - Ctrl+click on the first beta strand and press up-arrow to expand the selection to the entire strand. Select Actions ▹ Color ▹ Hot Pink to give the strand an interesting contrast.
- Select Actions ▹ Atoms/Bonds ▹ Show to display side chains. Then Ctrl+click the background to deselect.
- Ctrl-click any of the amino acid sidechains to select an atom, click the up-arrow to select the entire residue. Then select Actions ▹ Labels ▹ Residues ▹ Name and Number to identify it. This displays the amino acid type and residue number. Deselect.
- Type
color sequential #1/A palette blue-white-redinto the command line. The expression#1/Ameans: Model number one, chain A. You can find the model number in the Models pane, in the ID column. - Select Actions ▹ Atoms/Bonds ▹
Hide and Actions ▹
Labels ▹ Residues ▹
Off. Now issue a selection that spans the DNA
recognition domain and shows the side chains:
show #1/a:49-74 target ab. The first part selects, and thetargetcommand sends the selection to an action - in this caseab, “Atoms/Bonds”. Also set the cartoon representation in this region off:hide #1/a:49-74 cartoon. Note that you can Edit ▹ Undo and Edit ▹ Redo commands. - Select Select ▹ Chemistry ▹
Element ▹ H and
Actions ▹ Atoms/Bonds ▹
Hide to hide H-atoms. (Or type
hide H.) - Select Nitrogen atoms and colour them cornflower blue in this
region:
color #1/a:49-74@N* cornflower blue. Again, deselect.
That should get you an idea to get started. To note: if you know what you are doing, the command line is always faster than the menu. The menu helps you to explore what you don’t know yet. Every menu command is repeated with its command line equivalent in the Log pane, and every command is linked to its syntax-help. ChimeraX is very powerful, but it undoubtedly has a bit of a learning curve. However, the authors have done a great job to make learning easy.
- Quit ChimeraX, so we can restart it in a sane state.
Stereo Viewing
Stereo viewing is easy to learn with a molecular viewer like ChimeraX.
Being able to visualize and experience structure in 3D is an essential skill if you are even somewhat serious about understanding the molecules of molecular biology. This is not sufficiently realized in the field: many molecular biologists have never invested the small effort it takes to learn the skill, and they will tell you that it is not actually necessary, and you can get by regardless, after all they are doing just fine. Of course you are talking to a biased population – unless you have experienced and worked with stereo images, you won’t understand how much you are actually missing. Unfortunately, over the years, this attitude has become more and more prevalent as the older generation of structural biologists are retiring, and we are now in a situation where the default viewer on the PDB website, Mol*, aparently does not even support split-screen stereo anymore. Incredible. We are training a whole generation of (structural) molecular biologists who have an inreasingly underdeveloped intuition about the spatial relationships of the 3D-objects they are working with. This means you. You are losing out. I have a strong opinion on this matter: Not supporting stereo representation of structures is at its core anti-intellectual. And it is Cargo Cult. You should rebel.
Once you have acquired the skill, you’ll regret not having been taught earlier. Speak to people who use stereo vision: seeing molecules in 3D is like the difference between seeing a photograph of a place and actually being there. In 3D you can appreciate size, scale, distance, spatial relations all at a single glance. You can make perfect sense of partially hidden detail of overlapping clouds of atoms and bonds. And you can develop intuitions that are forever inaccessible to those who are only working with the structure’s shadows. I insist: you can’t understand structure unless you experience it in 3D.
From 2D to pseudo 3D
Images we see on
screen or on paper are two-dimensional projections, “shadows”, of
three-dimensional objects.
Even though hardware devices exist that support three-dimensional perception of computer graphics images, there is really no alternative to being able to fuse stereo pair images by just looking at them, without any device. ChimeraX is an excellent tool to practice stereo viewing and develop the skill. Stereo images consist of a left-eye and a right-eye view of the same object, with a slight rotation around the vertical axis (about 5 degrees). Your brain can accurately calculate depth from these two images, if they are presented to the right and left eye separately. This means you need to look at the two images and then fuse them into a single image - this happens when the left eye looks directly at the left image and the right eye at the right image.
In this tutorial, I teach you a method to learn stereo viewing. The method is pretty foolproof - I have taught this many years in my classes with virtually 100% success rates. But I can only teach you the method – learning must be done by you.
Some people find convergent (cross-eyed) stereo viewing easier to learn. I recommend the divergent (wall-eyed) viewing - not only because it is much more comfortable in my experience, but also because it is the default way in which stereo images in books and manuscripts are presented. The method explained below will only work for learning to view divergent stereo pairs.
Physiology
In order to visually fuse stereo image pairs, you need to override a vision reflex that couples divergence and focusing. This needs to be practiced for a while. Usually 5 to 10 minutes of practice twice daily for a week should be quite sufficient. It is not as hard as learning to ride a bicycle, but you need to practice regularly for some time, maybe 10 or 20 sessions of 3 to 5 minute over a period of a week or two. Once you have acquired the skill, it is really very comfortable and can be done effortlessly and for extended periods. You will enter a new world of molecular wonders!
Practice
Task…
Here are step by step instructions of how to practice stereo viewing with ChimeraX.
- Load a small protein into ChimeraX, the Mbp1 APSES domain structure
1BM8, and display it as a simple backbone model.
- Start ChimeraX. A gallery of thumbnails of recently loaded structures appears. Click on 1bm8.
- Type
color sequential /a palette cornflower:white:tealto apply a basic colour gradient that distinguishes the two ends of the amino acid chain: the N-terminus is cornflower blue, the C-terminus is teal. - Type
cartoon hideto hide the cartoon display. - Type
shape tube /a@CA radius 0.9 bandLength 4to create a tube that smoothly tracesCAatoms, and is coloured according to the atoms it is tracing +- abandLengthdistance. (Try setting a shortbandLengthfor a striped appearance.) - Next click on the Graphics tab, just below the top frame of the window.
- Select the Soft option in the Lighting menu bar at the top, to give good depth contrast and click on Shadow to produce more depth-cues. All of this will help initially establish the stereo-effect.
This sets up a simple scene that is suitable for practicing stereo viewing. Now we switch stereo on.
- Type
camera sbsto switch on side-by-side (“walleye”) stereo images. Close the Log and Models pane (click the ⓧ ).
The model could look something like this:

1BM8: Mbp1 transcription factor APSES domain rendered as a tube model, with depth-cueing applied and a colour-ramp emphasizing the fold from N-C terminus. The molecule is shown in wall-eye stereo: the left-hand image is rotated correctly for the left eye. You should resize the window of your molecular viewer (ChimeraX) until equivalent points are about 15% less than your pupil separation apart.
- For the next step, you need to know how far your eyes are apart. Not just approximately, but pretty accurately. Measure the distance between your pupils in front of a mirror, or have someone help you.
- Resize the horizontal distance of the viewing window by dragging its
lower right-hand corner. This changes the separation of the two views.
- Resize the window so that two equivalent points on the protein are about 15% closer together on the screen than the pupils of your eyes are apart. Calculate, and measure eg. the separation between a protruding loop on the left and right image. Don’t just guess, measure the distance, and adjust your on-screen scene to better than two or three millimetres of the correct separation.
- Also, the images themselves should be small: about the size of a postage stamp.
- Orient the white helix to the front and type
rock. (You can stop the rocking motion later by typingstop.)
Now follow these instructions exactly:
- Touch your nose and forehead to the screen to get your eyes directly in front of the two images. Make sure you see the right image with your right eye, the left with your left eye. Of course, since you are so close, the images will be blurred. Nevertheless, you should see one solid, three dimensional shape in the centre, plus two peripheral images of the same view on the sides. You see three copies of the same scene, but only the fused, overlapping centre scene appears three-dimensional; the other two become less noticeable as you practice more, your brain simply begins editing them out.
- Without moving your head, resize the window slightly left and right until the centre image overlaps and “fuses”. This way you find the exact distance for the images that works best for you. Slowly rotating the protein with the mouse helps generate the impression of a 3D object floating before you. Gaze at the image in the centre.
- Spend some time with this. Don’t worry that it is out of focus. Imagine that you are looking at something underwater with your eyes open. But make sure that you see one central fused image and it appears three-dimensional to you. Don’t continue unless you can achieve this. Ask for help if it doesn’t work for you.
- Once you see the impression of depth is established, try to move your head backwards slowly, until the structure comes into focus. Do not voluntarily try to focus, since this will induce your eyes to converge and you will lose the 3D effect. You should be relaxed, and passively achieve this effect. Don’t force it. After a short distance, you will probably lose the 3D effect. Once you loose the 3D effect, pause, close your eyes, then look somewhere else. Relax, take a deep breath and start over with your forehead on the screen.
- You will find that you will be able to hold the image for longer, then move your head further back, as you practice this. Give it time, you will be able to achieve focus on the 3D object.
Now start a practice routine!
- Practice this procedure patiently, three or four times daily for perhaps 3 to 5 minutes. Between lectures is ideal. Keep your scene in ChimeraX open and go to it frequently. But stop, when your head feels funny. Don’t force yourself. Better to practice more frequently for shorter periods.
Keep it up until you have mastered the skill.
After time and with practice, it will become easier and easier to achieve the effect. Also you will become quite independent of the distance of equivalent points, thus you can increase the viewer window size and take advantage of the increased resolution.
It might take you about a week or ten days to master this, with regular training it will become very easy. And, the best thing is, you do not easily forget this skill. It is like riding a bicycle, equalizing pressure in your ears while scuba diving, or circular breathing to play the didgeridoo: once you teach your body what to do, it remembers.
Global properties
In this series of tasks we will showcase some of the globally applied tools that help us study molecular structure.
B-factors
Task…
- To reset all views and selections, choose Tools ▹ Models. Select the 1BM8 model (if it’s still loaded from your stereo exercises) and the tube model and click the Close button to remove them.
- In the message bar at the bottom of the viewer window, click on the
“lightning bolt” icon at the bottom (this is the “Quick Access Screen”).
You should see a button labelled 1BM8 on the right. This is where you
will find recent structures. Click
1BM8to re-load it3. - Click on the Molecule Display tab and the
b-factor icon. The standard colouring scheme is blue -
white - red, but you can define your own palette, e.g. from black via
red to white, in a black-body spectrum(W):
color byattribute bfactor palette black:black:gray:gray:red:orange:yellow:white. - Type
cartoon hideandshow atoms, bonds. You will find that the core of the protein has low temperature factors, and the surface has a number of “glowingly” mobile sidechains and loops.
Structure of the yeast transcription factor Mbp1 DNA binding domain (1BM8) coloured by B-factor (thermal factor). The protein bonds are shown in a “stick” model, coloured with a spectrum that emulates black-body radiation. Note that the interior of the protein is less mobile, some of the surface loops are highly mobile (or statically disordered, X-ray structures can’t distinguish that) and the discretely bound water molecules that are visible in this high-resolution structure are generally more mobile than the residues they bind to.
Electrostatics
Task…
- Start by getting ChimeraX and your model in a fresh state. Choose File ▹ Close Session and click on the 1bm8 thumbnail to reload the structure.
- To visualize the electrostatic potential of the protein, mapped on
the surface, first type
color cyanfor a vividly contrasting color and thencoulombic protein range -10,10. - Use Actions ▹ Surface ▹ Transparency ▹ 30% to make the protein backbone somewhat visible.
- In the Graphics tab, set the background to White, the lighting to Flat, and the Silhouettes on.
- Can you identify the putative DNA binding site from the electrostatic potential of the 1BM8 surface?
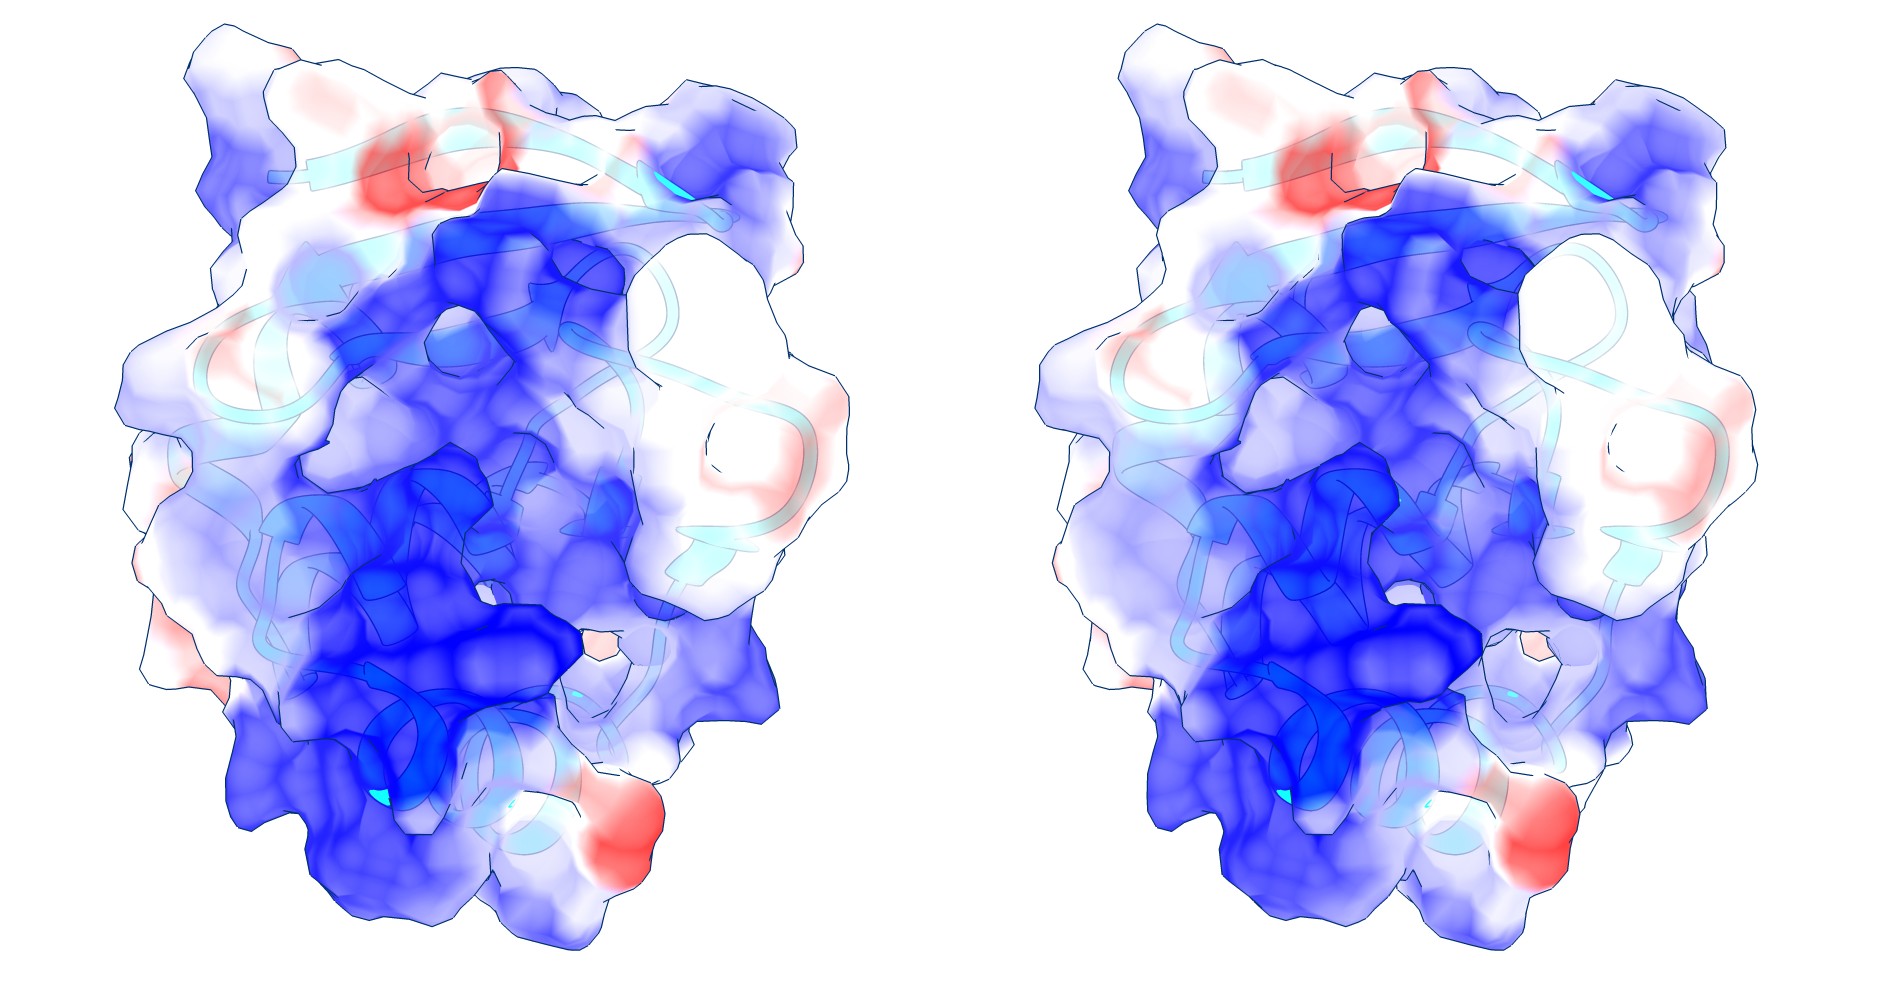
Coulomb (electrostatic) potential mapped to the solvent accessible surface of the yeast transcription factor Mbp1 DNA binding domain (1BM8). The protein backbone is visible through the transparent surface as a cartoon model, note the helix at the bottom of the structure. This helix has been suggested to play a role in forming the domain’s DNA binding site and the positive (blue) electrostatic potential of the region is consistent with binding the negatively charged phosphate backbone of DNA. The other side of the domain has a negative (red) charge excess, which balances the molecule’s electric charge overall, but also guides the protein-ligand interaction and supports faster on-rates.
Hydrogen bonds
Task…
- Hydrogen bonds encode the basic folding patterns of the protein. To visualize H-bonds, close and reload the model, hide the cartoon view, select Select ▹ Structure ▹ Backbone and Actions ▹ Atoms/Bonds ▹ Show Only.
- Next, Actions ▹ Color ▹ Grey.
- Use Tools ▹ Structure Analysis ▹ H-Bonds to open the H-bond dialogue window.
- Click on the colored square to select a nicer color, a light orange perhaps, for good contrast.
- To emphasize the role of H-bonds in determining the basic architecture of the protein, change Dashes to 0, increase Radius to 0.1Å, select Limit by selectionand choose with both ends selected. Click on OK, and deselect.
If the protein were an organism, you would now be looking at its skeleton.
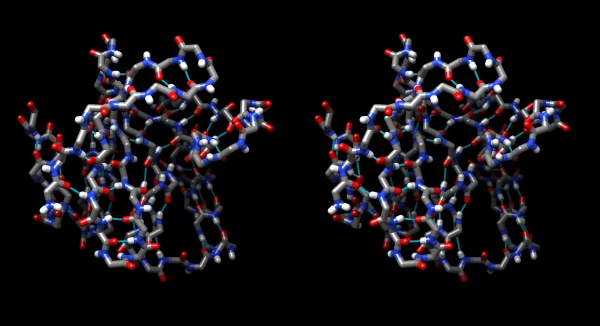
Hydrogen bonds shown for the peptide backbone of the yeast transcription factor Mbp1 DNA binding domain (1BM8). This view emphasizes the interactions of secondary structure elements that govern the folding topology of the domain.
ChimeraX sequence interface
In this task we will explore the sequence interface of ChimeraX, use it to select specific parts of a molecule, and colour specific regions (or residues) of a molecule separately.
Task…
- Close and reload the 1BM8 model.
- Type
color sequential /a palette blue:cornflower:gray:white:gray:pink:red.
- Open the sequence tool: Tools ▹ Sequence ▹ Show Sequence Viewer and click on Show in the selection diaolgue. The sequence viewer appears as a panel. By default, coloured rectangles overlay the secondary structure elements of the sequence.
- Hover the mouse over some residues and note that the sequence number and chain is shown as hovertext.
- Click/drag one residue to select it. (Simply a click wont work, you need to drag a little bit for the selection to catch on.) Note that the residue gets a green overlay in the sequence window, and it also gets selected with a green border in the graphics window.
- In the bottom of the sequence window, there are instructions how to
select (multiple) regions. Clear the selection by Ctrl+click’ing into an
empty spot of the viewer. Now select the region that encompasses the
residues that have been reported to form the DNA binding subdomain:
KRTRILEKEVLKETHEKVQGGFGKYQ(Taylor 2000). Show the side chains of these residues by typingshow sel atoms, bonds. - Undisplay the Hydrogen atoms by typing
hide H. Choose Actions ▹ Color ▹ By Element. Then add silhouettes.
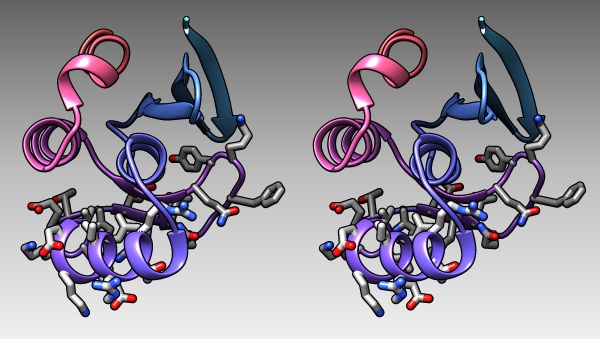
The DNA binding region of Mbp1 according to NMR measurements of DNA contact by Taylor et al. (2000). The backbone of 1BM8 is shown with a colour ramp from blue (N-terminus) to red (C-terminus). The side chains of the region 50-74 are shown coloured by element.
Structure Image Gallery
1BM8 Worm Plot
- Context
- Protein structure representation is just that - a representation. We can add or subtract value in the images we create based on what we make meaningful in our representations. Use of colour is widely embraced, but there is a multitude of properties we may want to denote in our representations: amino acid identity, hydrophobicity, occupancy, b-factor, etc. What can we use in addition to colour to demonstrate the nature of proteins?
-
Enter the sausage model. A kind of ribbon representation, the sausage (or “worm”) varies in radius according to a specified protein property.
-
Perhaps the first sausage model was created by John Kendrew 19574, in fact when he submitted his model to the British Science Museum, it was the first formal model of a protein. Kendrew created a wiggly representation of myoglobin out of plasticine5, and this revealed a new understanding of how proteins occupy space.
-
Today, we can use much more sophisticated methods to generate protein models, and in silico methods are constantly advancing. To demonstrate this, I’ve coloured 1BM8 (baker’s yeast MBP1) according to the secondary structure and rendered a worm plot based on B-factors in yeast MBP1. This helps give an idea of how B-factors are distributed over different structural and functional components of this domain.
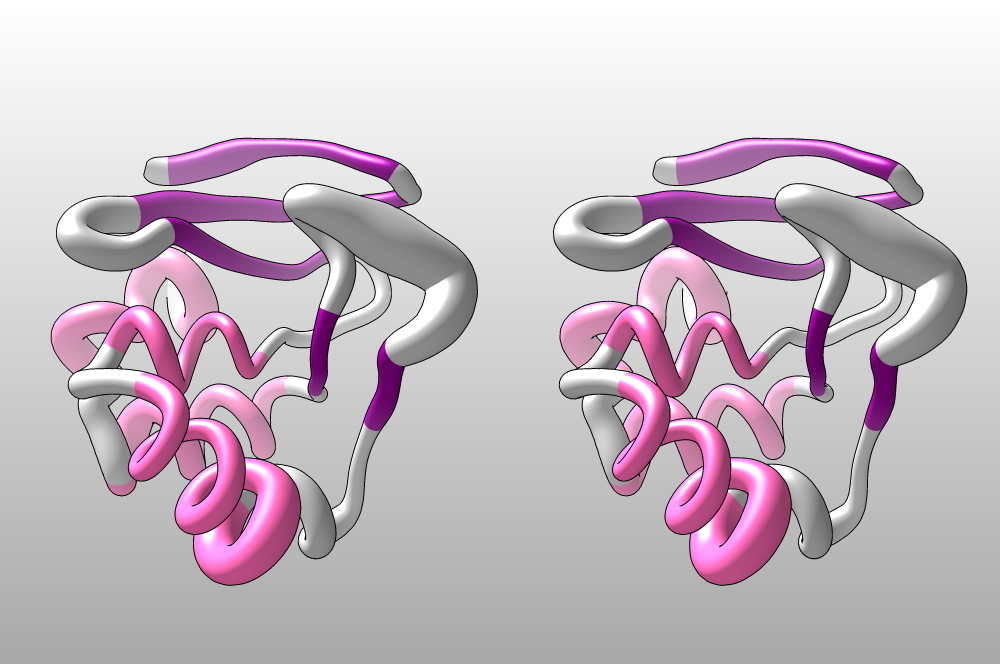
The 1BM8 structure, rendered as a worm plot. A larger
radius corresponds to a higher B-factor; this indicates structural
disorder. Alpha-helices are coloured pink, beta-strands are maroon. We
clearly see that this transcription factor’s DNA-binding helix and the
adjacent “Wing”, of DNA-contacting beta-strands both have unexpectedly
high B-factors. This may indicate that these elements are not well
integrated with the rest of the domain - which could point to dynamic
disorder, i.e. flexibility to facilitate induced fit, or static
disorder, arising from relatively high-energy conformations the domain
needs to present for detailed DNA binding. Both point to a functional
role of these disordered segements.
( (CC) Caitlin Harrigan (with edits by Boris Steipe))
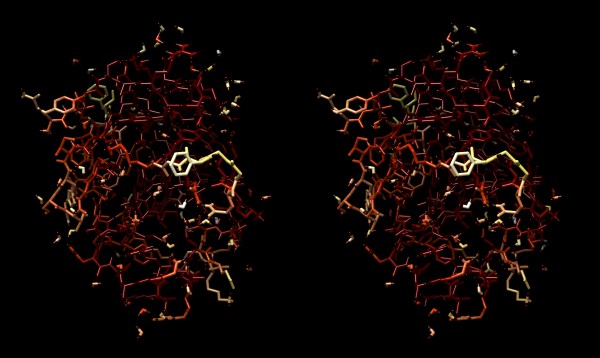
Catalytic triad as convergent evolution
- Context
-
Subtilisin and Trypsin are proteases, i.e. enzymes that hydrolyze peptide bonds in proteins. X-ray crystallography experiments have found that both Trypsin and Subtilisin have catalytic sites that are characterized by Aspartic acid, Histidine, and Serine in very similar positions relative to each other. 6 7 8 In an example of convergent evolution, despite very different overall structures, both enzymes have independently evolved the same “catalytic triad”. A catalytic triad cleaves amide and ester bonds by having the electrophilic oxygen atoms of serine form bonds with the nucleophilic carbons of the carbonyls in amide and esters. Histidine then donates the hydrogen to the nitrogen or oxygen of the amide or ester bonds, respectively, effectively breaking the bond 9. The structures depicted in the images below clearly display the catalytic triads of both enzymes in very similar positions. However the global architecture of the protein is entirely different. Subtilisin has many alpha-helices (dark green) while trypsin, has more beta strands (light green) and fewer alpha helices and unstructured connecting strands (grey).
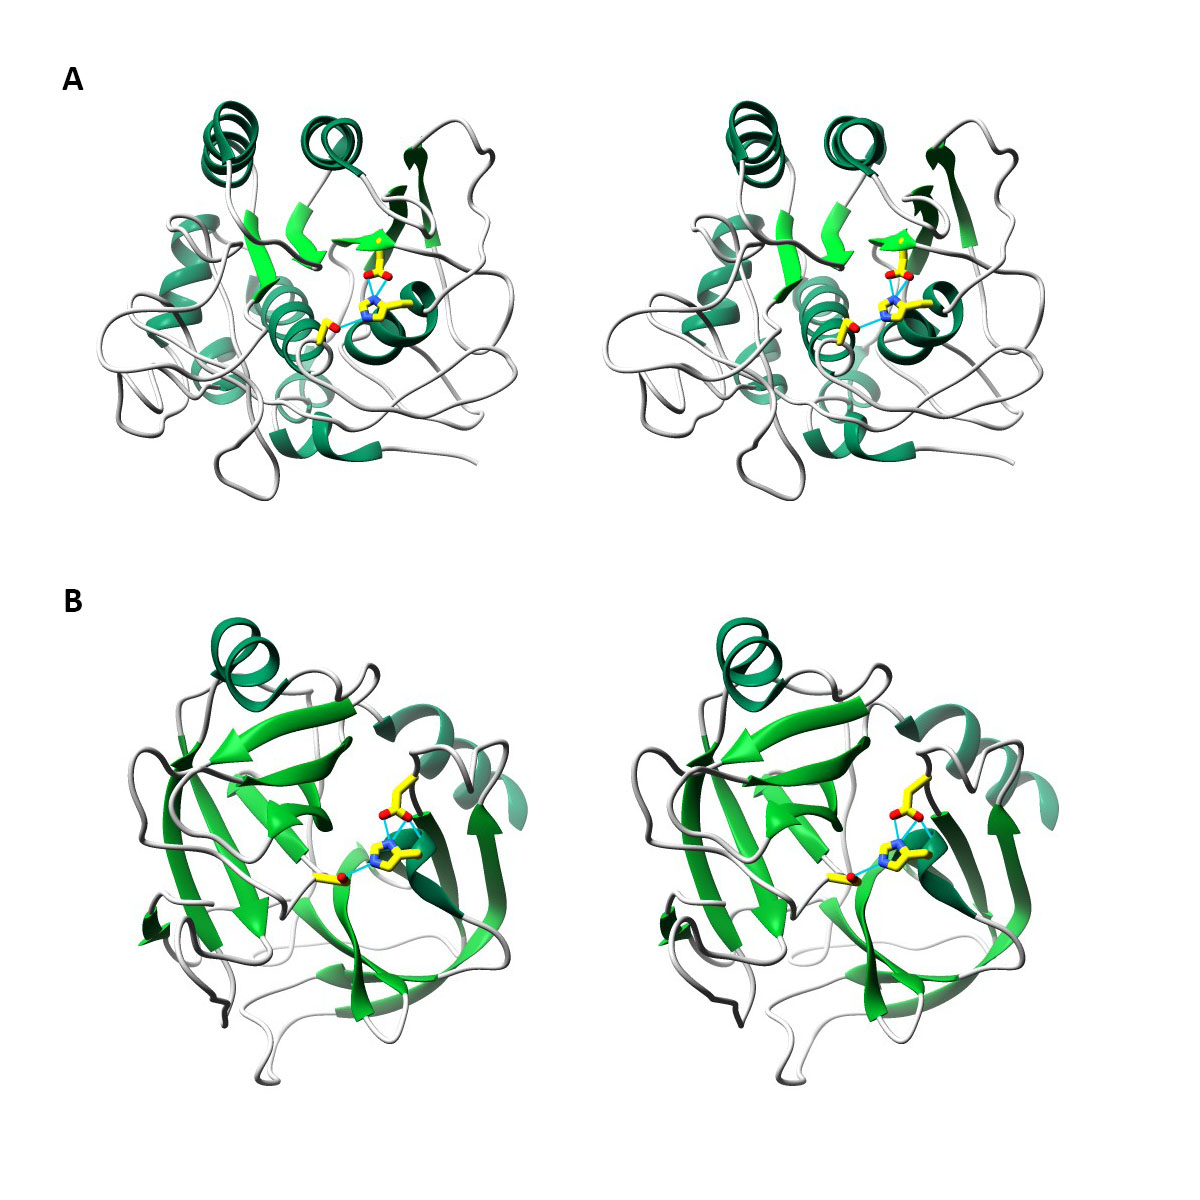
Wall-eyed stereo images of structures of Subtilisin (A) and Trypsin (B) with secondary structures coloured in shades of green and side chains of catalytic triad coloured in bright yellow and by atom (oxygen in red, nitrogen in blue). Hydrogen bonds that exist between the catalytic triads are shown in light blue lines. The domains were rotated and scaled to bring the catalytic triad into the same orientation.
( (CC) Suan Chin Yeo (with edits by Boris Steipe))
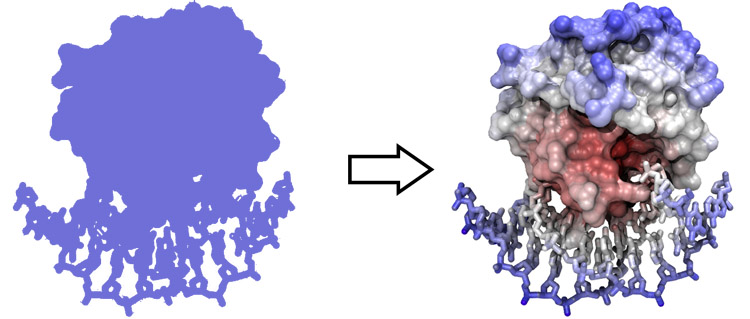
Y and W Delimit Transmembrane Domains
- Context
- Integral membrane proteins generally have a high concentration of tryptophan relative to proteins that are not anchored to the membrane bilayer 12. Tryptophan residues, along with tyrosine, cluster at protein’s interface region between the lipophilic bilayer and the aqueous environment of cells 13. Since tryptophan and tyrosine are hydrophobic amino acids, the clustering of such residues into a “belt” may serve to anchor the protein to the bilayer 14.
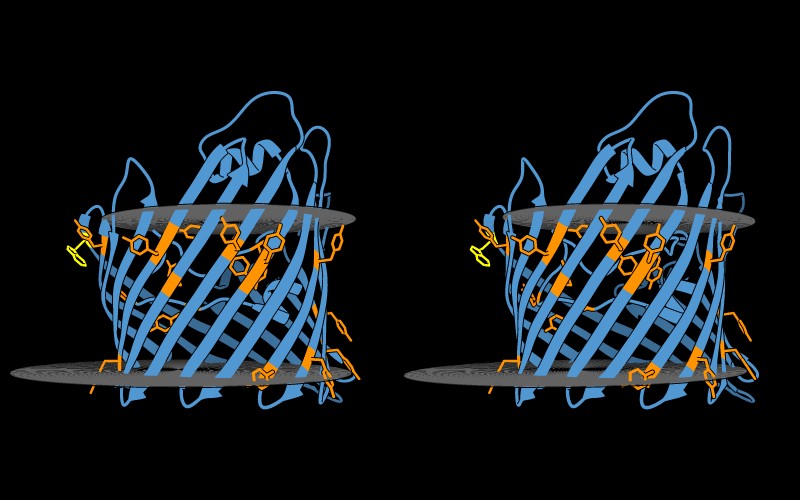
Tryptophan (yellow) and Tyrosine (orange) are highlighted in atom
form within the porin protein structure (PDB: 2POR). The
entire protein is depicted as embedded in the membrane bilayer, with
gray planes representing the membrane boundaries 15. Inclusion of the
membrane reveals that tryptophan and tyrosine residues are restricted to
the region within the membrane bilayer, thus appearing as a band along
the transmembrane region.
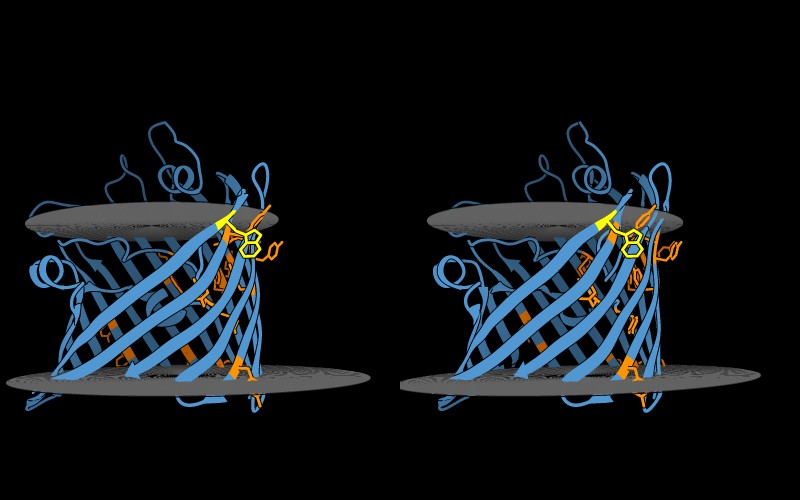
Rotation of the porin structure reveals that tryptophan and tyrosine do not create a continuous band along the transmembrane region. There is a lack of tryptophan and tyrosine residues on the side of porin in which the protein interacts with other porin proteins to create the homotrimeric membrane channel 16.
( (CC) Janeane Santos (with edits by Boris Steipe))
Further Reading
Pettersen, Eric
F et al.. (2021). “UCSF ChimeraX: Structure visualization
for researchers, educators, and developers”. Protein Science : A
Publication of The Protein Society 30(1):70–82
.
[PMID: 32881101]
[DOI: 10.1002/pro.3943]
Questions, comments
If in doubt, ask! If anything about this contents is not clear to you, do not proceed but ask for clarification. If you have ideas about how to make this material better, let’s hear them. We are aiming to compile a list of FAQs for all learning units, and your contributions will count towards your participation marks.
Improve this page! If you have questions or comments, please post them on the Quercus Discussion board with a subject line that includes the name of the unit.
References
[END]
Previous versions of the course used UCSF Chimera and some of the example code and images might still reflect that - don’t be confused.↩︎
That’s the same effect as when you are watching a 3D movie in the theatre, with polarized glasses: If you have weak posture or a cute neighbour and slouch to the side, your eyes become misaligned relative to the separated images on the screen, your visual system tries to compensate, but over time you get a headache. This is how stereo-haters are bred.↩︎
If you ever get to the Quick Access Screen by mistake, just click the lightning bolt icon again to return to the Viewer.↩︎
Chadarevian, Soraya De. Designs for Life: Molecular Biology after World War II. Cambridge University Press, 2011.↩︎
(Rester et al. 1999)↩︎
(Drenth et al. 1972)↩︎
(Alden et al. 1971)↩︎
(Dodson and Wlodawer 1998)↩︎
(Alden et al. 1971)↩︎
(Rester et al. 1999)↩︎
(Schiffer, Chang, and Stevens 1992)↩︎
(Sun et al. 2008)↩︎
Sigma-Aldrich. (n.d.) Sigma-Aldrich Amino Acids Reference Chart. Retrieved December 2, 2017 from https://www.sigmaaldrich.com/life-science/metabolomics/learning-center/amino-acid-reference-chart.html↩︎
(Jacoboni et al. 2001)↩︎
(Kreusch et al. 1994)↩︎
(Jacoboni et al. 2001)↩︎