Difference between revisions of "Stereo Vision"
m (→Instructions) |
|||
| (41 intermediate revisions by 2 users not shown) | |||
| Line 1: | Line 1: | ||
| + | <div id="BIO"> | ||
| + | <div class="b1"> | ||
| + | Stereo Vision Tutorial | ||
| + | </div> | ||
| + | |||
| + | |||
| + | This page explains the principle of stereo vision and offers a simple tutorial to acquire the skill. | ||
| + | |||
| + | |||
| + | __TOC__ | ||
| + | |||
| + | |||
| + | | ||
==Introduction== | ==Introduction== | ||
| − | Being able to visualize and experience | + | Being able to visualize and experience structure in 3D is an essential skill if you are at all serious about understanding the molecules of molecular biology. This is not sufficiently realized in the field: many molecular biologists have never invested the effort it takes to learn the skill and thus will tell you that it is not actually necessary, and you can get by regardless. Of course you are talking to a biased population – unless you have experienced and worked with stereo images, you can't understand how much you are actually missing. But once you have acquired the skill, you'll regret not having been taught earlier. Speak to people who use stereo vision: seeing molecules in 3-D is like the difference between seeing a photograph of a place and actually being there. In 3D you can appreciate size, scale, distance, spatial relations all at a single glance. I insist: '''you can't understand structure unless you experience it in 3D'''. |
| − | |||
| − | |||
| − | + | [[Image:2D_3D.jpg|frame|none|From 2D to ''pseudo'' 3D<br> | |
| − | In order to visually fuse stereo image pairs, you need to override a vision reflex that couples ''divergence'' and ''focussing'' | + | Images we see on screen or on paper are two-dimensional projections of three-dimensional objects. |
| + | ]] | ||
| + | |||
| + | |||
| + | Even though hardware devices exist that help in the three-dimensional perception of computer graphics images, for the serious structural biologist there is really no alternative to being able to fuse stereo pair images by looking at them. Chimera is an excellent tool to practice stereo vision and develop the skill. Stereo images consist of a left-eye and a right-eye view of the same object, with a slight rotation around the vertical axis (about 5 degrees). Your brain can accurately calculate depth from these two images, if they are presented to the right and left eye separately. This means you need to look at the two images and then fuse them into a single image - this happens when the left eye looks directly at the left image and the right eye at the right image. | ||
| + | |||
| + | In this tutorial, I teach you a method to learn stereo viewing. The method is pretty foolproof - I have taught this many years in my classes with virtually 100% success rates. But I can only teach you the method – ''learning'' must be done by you. | ||
| + | |||
| + | <small>Some people find convergent (cross-eyed) stereo viewing easier to learn. I recommend the divergent (wall-eyed) viewing - not only because it is much more comfortable in my experience, but also because it is the default way in which stereo images in books and manuscripts are presented. The method explained below will '''only''' work for learning to view '''divergent''' stereo pairs.</small> | ||
| + | |||
| + | |||
| + | | ||
| + | |||
| + | ===Physiology=== | ||
| + | |||
| + | In order to visually fuse stereo image pairs, you need to override a vision reflex that couples ''divergence'' and ''focussing''. This needs to be practiced for a while. Usually 5 to 10 minutes of practice twice daily for a week should be quite sufficient. It is not as hard as learning to ride a bicycle, but you need to practice regularly for some time, maybe 10 or 20 sessions of 3 to 5 minute over a period of a week or two. Once you have acquired the skill, it is really very comfortable and can be done effortlessly and for extended periods. You will enter a new world of molecular wonders ! | ||
| + | |||
| + | |||
| + | | ||
==Instructions== | ==Instructions== | ||
| − | |||
| − | *Load a small protein into | + | {{task|1= |
| − | *Set stereo display to SideBySide | + | Here are step by step instructions of how to practice stereo-viewing with Chimera. |
| − | *Resize the window | + | |
| − | *Touch your nose to the screen | + | *Load a small protein into Chimera (The Mbp1 APSES domain structure 1BM8 will work just fine) and display this as a simple backbone model. |
| − | * | + | **Select '''File'''→'''Fetch by ID...''' choose '''PDB''', type <tt>1BM8</tt> in the form and click '''Fetch'''. |
| − | + | **Choose '''Presets''' → '''Publication 1 ...''', and | |
| + | ** ... '''Tools''' → '''Viewing Controls''' → '''Effects''': check '''depth cueing''' ON and '''shadows''' OFF; use the '''Side View''' menu to move the clipping planes close to your model. | ||
| + | **Apply a nice coloring ramp: '''Tools''' → '''Depiction''' → '''Rainbow''' and click '''Apply''' | ||
| + | *Set the stereo display to SideBySide: | ||
| + | **'''Tools''' → '''Viewing Controls''' → '''Camera''' and select '''camera mode: wall-eye stereo'''. | ||
| + | * Tune the stereo vision parameters. The default settings require a bit of adjustment for comfortable viewing and accurate depth perception. You should try to emulate your actual physical dimensions - an eye separation of 5.5 cm and a distance to screen of 45 cm seems to work well for me: if the distance to screen is too close, the stereo effect becomes unnaturally exaggerated and the images are hard to fuse. | ||
| + | |||
| + | The model could look something like this: | ||
| + | |||
| + | |||
| + | {{stereo|1BM8_basic_stereo.jpg|'''1BM8: Mbp1 transcription factor APSES domain''' rendered as a ribbon model, with depth-cueing applied and a colour-ramp emphasizing the fold from N-C terminus. The molecule is shown in '''wall-eye stereo''': the left-hand image is rotated correctly for the left eye. You should resize the window of your molecular viewer (Chimera) until ''equivalent'' points are about 15% less than your pupil separation apart.}} | ||
| + | |||
| + | |||
| + | *Resize the horizontal distance of the viewing window by dragging its lower right-hand corner. This changes the separation of the two views. | ||
| + | **Two equivalent points on the protein should be about 15% closer together on the screen than the pupils of your eyes are apart (the average interocular separation is about 6.5 cm). | ||
| + | **And the images themselves should be small: about the size of a postage stamp. Don't just guess, measure the distance, and adjust your on-screen scene to better than two or three millimetres of the correct separation. | ||
| + | |||
| + | ;Now follow these instructions exactly: | ||
| + | |||
| + | *Touch your nose and forehead to the screen to get your eyes '''directly in front of the two images'''. Make sure you see the right image with your right eye, the left with your left eye. Of course, since you are so close, the images will be blurred. Nevertheless, you should see one solid, three dimensional shape in the centre, plus two peripheral images of the same view on the sides. <small>You see three copies of the same scene, but only the fused, overlapping centre scene appears three-dimensional; the other two become less noticeable as you practice more, your brain simply begins editing them out.</small> | ||
| + | |||
| + | *Without moving your head, resize the window slightly left and right until the centre image overlaps and "fuses". This way you find the ''exact'' distance for the images that works best for you. Slowly rotating the protein with the mouse helps generate the impression of a 3D object floating before you. | ||
| − | It | + | *Spend some time with this. Don't worry that it is out of focus. Imagine that you are looking at something underwater with your eyes open. But make sure that you see '''one central fused image''' and it appears three-dimensional to you. <small>Don't continue unless you can achieve this. Ask for help if it doesn't work for you.</small> |
| + | |||
| + | *Once you see the object in 3D, try to move your head backwards slowly, until the structure comes into focus. Do not voluntarily try to focus, since this will induce your eyes to converge and you will lose the 3D effect. You should be relaxed, and passively achieve this effect. Don't force it. After a short while, you will probably lose the 3D effect. Once you loose the 3D effect, pause, close your eyes, then look somewhere else. Relax, take a deep breath and start over. | ||
| + | |||
| + | *With time, you will be able to achieve focus. | ||
| + | |||
| + | |||
| + | }} | ||
| + | |||
| + | |||
| + | Practice this procedure patiently, two times daily for some 3 to 5 minutes. Stop, when your head feels funny. Don't force yourself. | ||
| + | |||
| + | After time and with practice, it will become easier and easier to achieve the effect. Also you will become quite independent of the distance of equivalent points, thus you can increase the viewer window size and take advantage of the increased resolution. | ||
| + | |||
| + | It might take you about a week or ten days to master this, with regular training it will become very easy. And, the best thing is, you do not easily forget this skill. It is like riding a bicycle, equalizing pressure in your ears while scuba diving, or circular breathing to play the didgeridoo: once you teach your body what to do, it remembers. | ||
| + | |||
| + | |||
| + | | ||
==Examples== | ==Examples== | ||
| − | |||
| − | == | + | Here are example scenes to practice stereo viewing. However, they are static, and moving images help the eyes remain focussed on the 3D effect. You could also refer to the BCH441 [[Stereo_Vision_Exam_Questions|'''Stereo Vision Exam Questions''']]. |
| − | [ | + | |
| + | |||
| + | | ||
| + | |||
| + | ====Abstract Shapes==== | ||
| + | |||
| + | {{stereo|ThreeCircles.jpg|'''Three staggered circles'''. Side by side stereo image. These are three circles staggered from front (top) to back (bottom). There are no secondary visual depth-cues at all, such as perspective drawing, size changes or occlusions. Once you see the circles in stereo however, their spatial relationship should become vividly obvious.}} | ||
| + | |||
| + | |||
| + | {{stereo|CubeBasic.jpg|'''A cube'''. Side by side stereo image. This is a simple cube, drawn in orthographic projection and sligthly rotated. Other than the pseudo-perspective angling of the lines going towrads the back, there are no secondary visual depth-cues, such as occlusions or shading. This makes the 2D representation ambiguous regarding which face is closer to the viewer. If you look at only one of the images, you should be able to mentally invert the cube back-to front. In fact, when you concentrate on seeing the cube in a particular way, it becomes impossible to maintain this interpretation for more than abou ten seconds or so: your visual system forces the switch and thus explores all of the ambiguous interpretations. Once you see the cube in stereo however, it becomes clear that the face further to the left is closer to you. Concentrating on the image in stereo '''enforces''' the correct interpretation, rather than causing a switch.}} | ||
| + | |||
| + | |||
| + | |||
| + | {{stereo|CubeFlat.jpg|'''A flat cube'''. '''Not ''' a stereo image! This is the left eye image from above in duplicate. If you look at this scene like a Side By Side stereo image, it appears flat, and the back-to-front switching phenomenon occurs.}} | ||
| + | |||
| + | |||
| + | |||
| + | [[Image:CubeSuperimposed.jpg|frame|none|'''Left and Right Image superimposed'''<br> <br> | ||
| + | This is a superposition of the left and right eye views of the cube above, demonstrating the subtle differences that the visual systems uses to construct the appearance of three-dimensionality. | ||
| + | ]] | ||
| + | |||
| + | |||
| + | | ||
| + | |||
| + | ====Molecular Structures==== | ||
| + | |||
| + | |||
| + | {{stereo|2MCP_overview.jpg|'''An antibody Fab and its hapten'''<br> <br> | ||
| + | Side by side stereo image. The two chains of the Fab fragment of the phosphocholine-binding antibody McPC603 are shown in a cartoon representation, the light chain is in yellow (VL and CL domain), the two domains of the heavy chain are shown in orange (VH and CH1 - The CH2 and CH3 domains are part of the Fc fragment, not shown here). The bound hapten phosphorylcholine is shown in red in a surface representation. | ||
| + | }} | ||
| + | |||
| + | |||
| + | |||
| + | {{stereo|2MCP_colors.jpg|'''Fold architecture in an antibody Fab'''<br> <br> | ||
| + | Side by side stereo image. The two chains of the structure have been color-ramped according to their atom-index in the PDB file to highlight the overall fold of the four domains. These are so-called ''greek-key beta barrels'': each domain comprises a two-sheet barrel with a hydrophobic core. The chain meanders first through half of the first sheet, crosses over the '''top''' of the domain, creates half of the other sheet, crosses back along the side, completes the first sheet, crosses '''under''' the domain and completes the second sheet. In stereo, it is easy to trace the chain architecture by eye. | ||
| + | }} | ||
| + | |||
| + | |||
| + | |||
| + | {{stereo|2MCP_PCbinding.jpg|'''The antigen binding site with bound phosphorylcholine'''<br> <br> | ||
| + | Side by side stereo image. A transparent solvent-accessible surface, lightly shaded by position has been laid over a licorice representation of the protein atoms. A ball-and-stick (CPK) representation was used for the hapten. Elements are color coded red for oxygen, silver for carbon, blue for nitrogen; phosphorous is green. In this representation we can discern element types and bonding topology of the structure, as well as the shape of the binding site that the protein conformation has generated. | ||
| + | |||
| + | A deep binding pocket accommodates the choline end of the hapten, the phosphate group is exposed to solvent. All molecular features of the hapten are discretely used in binding: the two oxygen atoms of a negatively charged aspartic acid can be seen at the bottom of the binding pocket, offsetting the positively charged trimethylammonium group of choline. Conversely, a positively charged arginine sidechain at the top, right, forms a saltbridge with the neagtively charged phosphate group. A tyrosine above the arginine hydrogen bonds one of the phosphate oxygens, while the hydrophobic sides of the binding pocket are formed by a tryptophan sidechain (top) and a tyrosine sidechain (bottom).}} | ||
| + | |||
| + | |||
| + | |||
| + | {{stereo|4IJE_stereo.jpg|'''4IJE: Zaire ebolavirus VP35 interferon inhibitory domain mutant''' This simple structure is rendered as a ribbon model, with depth-cueing applied and a colour-ramp emphasizing the fold from N-C terminus. | ||
| + | }} | ||
| + | |||
| + | |||
| + | | ||
| + | |||
| + | ==Common problems== | ||
| + | |||
| + | |||
| + | Some people get confused as to what they are "supposed" to see. You see two images of an object and you see them with each eye, i.e. in principle there are four images. The two central images (image L as seen with the left eye, image R as seen with the right eye) should overlap in the middle; these two images fuse in your visual system to create '''one 3D image'''. The two peripheral images still remain; since you don't concentrate on them, your visual system will ''edit'' them out of consciousness as you gain experience. | ||
| + | |||
| + | There are two situations which interfere with stereo vision. One such situation is if the images presented to your eye are of '''unequal size'''. This can happen if you are using glasses with significantly different correction for each eye - the lenses then have different magnifications. The other situation is if equivalent points of the images are vertically '''misaligned''', i.e. one of the images is shifted up or down, or rotated. This can occur when your head is tilted relative to the image. Keep your head straight<ref>That's the same effect as when you are watching a stereo movie with polarized glasses: If you have weak posture or a cute neighbour and slouch to the side, your eyes become misaligned relative to the separated images on the screen, your visual system tries to compensate, but over time you get a headache. This is how stereo-haters are made.</ref>. | ||
| + | |||
| + | Images that are difficult to see in 3D are also images that are '''rendered differently''' for the left- and right view: non-aligned jagged edges, differing shadows or highlights disturb the stereo effect. To prevent this, try to apply visual effects judiciously. Chimera is quite good with it's rendering but e.g. specular highlights in some molecular viewers are quite inconsistent between left and right. Even in Chimera, hard shadows are not quite right, better to turn shadow effects off. (If you are a programmer, remember to write your code to move the camera location, don't rotate the object because that will incorrectly change shadowing.) | ||
| + | |||
| + | Of course, if you are practicing '''wall-eyed''' viewing, the so-called '''cross-eyed''' stereo images won't work for you. They look like the real thing, but the left-eye view is on the right-hand side and vice versa. You can tell that they are wrong when you achieve the image fusion because the 3-D effect seems to be all wrong. This is because the image becomes inverted in depth: near points appear far away and vice versa. If you are looking at a simple line drawing, you can't tell that this is happening. However if there are any secondary depth cues in the image, such as occlusions, shadows, highlights etc., they are in the wrong places, won't work to enhance the depth effect and just generally look weird. <small>Once you are comfortable with stereo viewing, you can try this deliberately by selecting cross-eyed display in Chimera. Inverted space is very strange.</small> | ||
| + | |||
| + | |||
| + | | ||
| + | |||
| + | ==Notes== | ||
| + | <references /> | ||
| + | |||
| + | ==Further reading and resources== | ||
| + | <!-- {{WWW|WWW_UniProt}} --> | ||
| + | <div class="reference-box">[http://en.wikipedia.org/wiki/Stereopsis Stereopsis] - Wikipedia article on why we see in three dimensions</div> | ||
| + | <div class="reference-box">[http://en.wikipedia.org/wiki/Stereoscopy Stereoscopy] - Wikipedia article on the techniques for stereo images</div> | ||
| + | {{#pmid:21490023}} | ||
| + | |||
| − | + | | |
| + | [[Category:Bioinformatics]] | ||
| − | + | </div> | |
| − | |||
Latest revision as of 21:06, 17 October 2016
Stereo Vision Tutorial
This page explains the principle of stereo vision and offers a simple tutorial to acquire the skill.
Contents
Introduction
Being able to visualize and experience structure in 3D is an essential skill if you are at all serious about understanding the molecules of molecular biology. This is not sufficiently realized in the field: many molecular biologists have never invested the effort it takes to learn the skill and thus will tell you that it is not actually necessary, and you can get by regardless. Of course you are talking to a biased population – unless you have experienced and worked with stereo images, you can't understand how much you are actually missing. But once you have acquired the skill, you'll regret not having been taught earlier. Speak to people who use stereo vision: seeing molecules in 3-D is like the difference between seeing a photograph of a place and actually being there. In 3D you can appreciate size, scale, distance, spatial relations all at a single glance. I insist: you can't understand structure unless you experience it in 3D.
Even though hardware devices exist that help in the three-dimensional perception of computer graphics images, for the serious structural biologist there is really no alternative to being able to fuse stereo pair images by looking at them. Chimera is an excellent tool to practice stereo vision and develop the skill. Stereo images consist of a left-eye and a right-eye view of the same object, with a slight rotation around the vertical axis (about 5 degrees). Your brain can accurately calculate depth from these two images, if they are presented to the right and left eye separately. This means you need to look at the two images and then fuse them into a single image - this happens when the left eye looks directly at the left image and the right eye at the right image.
In this tutorial, I teach you a method to learn stereo viewing. The method is pretty foolproof - I have taught this many years in my classes with virtually 100% success rates. But I can only teach you the method – learning must be done by you.
Some people find convergent (cross-eyed) stereo viewing easier to learn. I recommend the divergent (wall-eyed) viewing - not only because it is much more comfortable in my experience, but also because it is the default way in which stereo images in books and manuscripts are presented. The method explained below will only work for learning to view divergent stereo pairs.
Physiology
In order to visually fuse stereo image pairs, you need to override a vision reflex that couples divergence and focussing. This needs to be practiced for a while. Usually 5 to 10 minutes of practice twice daily for a week should be quite sufficient. It is not as hard as learning to ride a bicycle, but you need to practice regularly for some time, maybe 10 or 20 sessions of 3 to 5 minute over a period of a week or two. Once you have acquired the skill, it is really very comfortable and can be done effortlessly and for extended periods. You will enter a new world of molecular wonders !
Instructions
Task:
Here are step by step instructions of how to practice stereo-viewing with Chimera.
- Load a small protein into Chimera (The Mbp1 APSES domain structure 1BM8 will work just fine) and display this as a simple backbone model.
- Select File→Fetch by ID... choose PDB, type 1BM8 in the form and click Fetch.
- Choose Presets → Publication 1 ..., and
- ... Tools → Viewing Controls → Effects: check depth cueing ON and shadows OFF; use the Side View menu to move the clipping planes close to your model.
- Apply a nice coloring ramp: Tools → Depiction → Rainbow and click Apply
- Set the stereo display to SideBySide:
- Tools → Viewing Controls → Camera and select camera mode: wall-eye stereo.
- Tune the stereo vision parameters. The default settings require a bit of adjustment for comfortable viewing and accurate depth perception. You should try to emulate your actual physical dimensions - an eye separation of 5.5 cm and a distance to screen of 45 cm seems to work well for me: if the distance to screen is too close, the stereo effect becomes unnaturally exaggerated and the images are hard to fuse.
The model could look something like this:
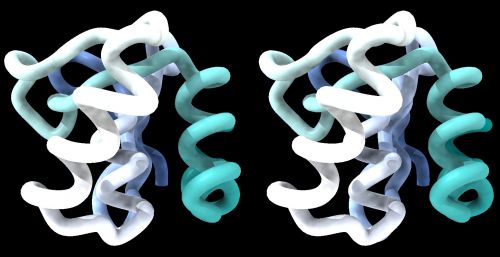
1BM8: Mbp1 transcription factor APSES domain rendered as a ribbon model, with depth-cueing applied and a colour-ramp emphasizing the fold from N-C terminus. The molecule is shown in wall-eye stereo: the left-hand image is rotated correctly for the left eye. You should resize the window of your molecular viewer (Chimera) until equivalent points are about 15% less than your pupil separation apart.
- Resize the horizontal distance of the viewing window by dragging its lower right-hand corner. This changes the separation of the two views.
- Two equivalent points on the protein should be about 15% closer together on the screen than the pupils of your eyes are apart (the average interocular separation is about 6.5 cm).
- And the images themselves should be small: about the size of a postage stamp. Don't just guess, measure the distance, and adjust your on-screen scene to better than two or three millimetres of the correct separation.
- Now follow these instructions exactly
- Touch your nose and forehead to the screen to get your eyes directly in front of the two images. Make sure you see the right image with your right eye, the left with your left eye. Of course, since you are so close, the images will be blurred. Nevertheless, you should see one solid, three dimensional shape in the centre, plus two peripheral images of the same view on the sides. You see three copies of the same scene, but only the fused, overlapping centre scene appears three-dimensional; the other two become less noticeable as you practice more, your brain simply begins editing them out.
- Without moving your head, resize the window slightly left and right until the centre image overlaps and "fuses". This way you find the exact distance for the images that works best for you. Slowly rotating the protein with the mouse helps generate the impression of a 3D object floating before you.
- Spend some time with this. Don't worry that it is out of focus. Imagine that you are looking at something underwater with your eyes open. But make sure that you see one central fused image and it appears three-dimensional to you. Don't continue unless you can achieve this. Ask for help if it doesn't work for you.
- Once you see the object in 3D, try to move your head backwards slowly, until the structure comes into focus. Do not voluntarily try to focus, since this will induce your eyes to converge and you will lose the 3D effect. You should be relaxed, and passively achieve this effect. Don't force it. After a short while, you will probably lose the 3D effect. Once you loose the 3D effect, pause, close your eyes, then look somewhere else. Relax, take a deep breath and start over.
- With time, you will be able to achieve focus.
Practice this procedure patiently, two times daily for some 3 to 5 minutes. Stop, when your head feels funny. Don't force yourself.
After time and with practice, it will become easier and easier to achieve the effect. Also you will become quite independent of the distance of equivalent points, thus you can increase the viewer window size and take advantage of the increased resolution.
It might take you about a week or ten days to master this, with regular training it will become very easy. And, the best thing is, you do not easily forget this skill. It is like riding a bicycle, equalizing pressure in your ears while scuba diving, or circular breathing to play the didgeridoo: once you teach your body what to do, it remembers.
Examples
Here are example scenes to practice stereo viewing. However, they are static, and moving images help the eyes remain focussed on the 3D effect. You could also refer to the BCH441 Stereo Vision Exam Questions.
Abstract Shapes
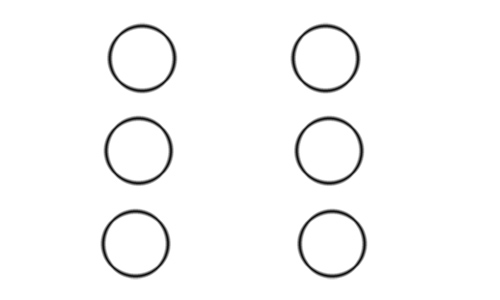
Three staggered circles. Side by side stereo image. These are three circles staggered from front (top) to back (bottom). There are no secondary visual depth-cues at all, such as perspective drawing, size changes or occlusions. Once you see the circles in stereo however, their spatial relationship should become vividly obvious.
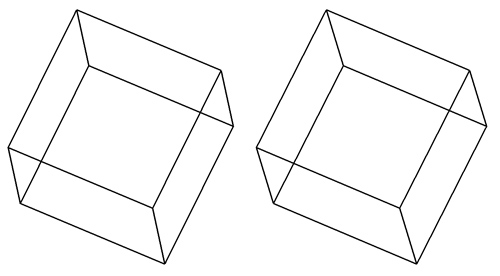
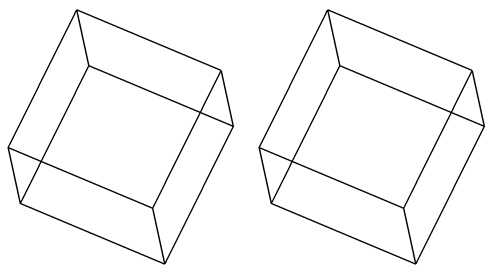
A cube. Side by side stereo image. This is a simple cube, drawn in orthographic projection and sligthly rotated. Other than the pseudo-perspective angling of the lines going towrads the back, there are no secondary visual depth-cues, such as occlusions or shading. This makes the 2D representation ambiguous regarding which face is closer to the viewer. If you look at only one of the images, you should be able to mentally invert the cube back-to front. In fact, when you concentrate on seeing the cube in a particular way, it becomes impossible to maintain this interpretation for more than abou ten seconds or so: your visual system forces the switch and thus explores all of the ambiguous interpretations. Once you see the cube in stereo however, it becomes clear that the face further to the left is closer to you. Concentrating on the image in stereo enforces the correct interpretation, rather than causing a switch.
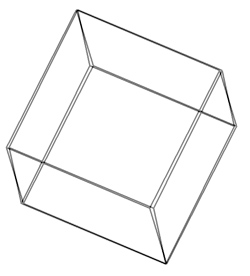
A flat cube. Not a stereo image! This is the left eye image from above in duplicate. If you look at this scene like a Side By Side stereo image, it appears flat, and the back-to-front switching phenomenon occurs.
Molecular Structures
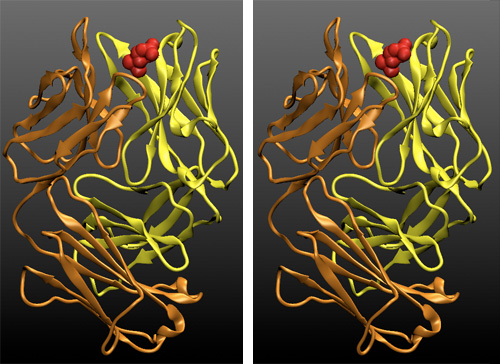
An antibody Fab and its hapten
Side by side stereo image. The two chains of the Fab fragment of the phosphocholine-binding antibody McPC603 are shown in a cartoon representation, the light chain is in yellow (VL and CL domain), the two domains of the heavy chain are shown in orange (VH and CH1 - The CH2 and CH3 domains are part of the Fc fragment, not shown here). The bound hapten phosphorylcholine is shown in red in a surface representation.
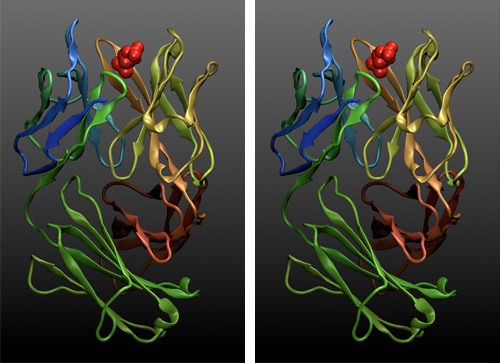
Fold architecture in an antibody Fab
Side by side stereo image. The two chains of the structure have been color-ramped according to their atom-index in the PDB file to highlight the overall fold of the four domains. These are so-called greek-key beta barrels: each domain comprises a two-sheet barrel with a hydrophobic core. The chain meanders first through half of the first sheet, crosses over the top of the domain, creates half of the other sheet, crosses back along the side, completes the first sheet, crosses under the domain and completes the second sheet. In stereo, it is easy to trace the chain architecture by eye.
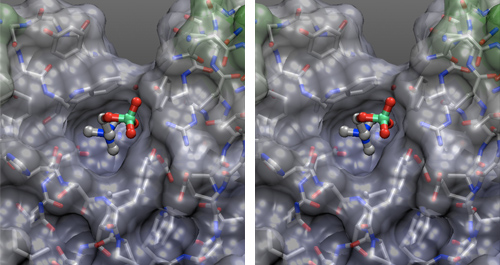
The antigen binding site with bound phosphorylcholine
Side by side stereo image. A transparent solvent-accessible surface, lightly shaded by position has been laid over a licorice representation of the protein atoms. A ball-and-stick (CPK) representation was used for the hapten. Elements are color coded red for oxygen, silver for carbon, blue for nitrogen; phosphorous is green. In this representation we can discern element types and bonding topology of the structure, as well as the shape of the binding site that the protein conformation has generated.
A deep binding pocket accommodates the choline end of the hapten, the phosphate group is exposed to solvent. All molecular features of the hapten are discretely used in binding: the two oxygen atoms of a negatively charged aspartic acid can be seen at the bottom of the binding pocket, offsetting the positively charged trimethylammonium group of choline. Conversely, a positively charged arginine sidechain at the top, right, forms a saltbridge with the neagtively charged phosphate group. A tyrosine above the arginine hydrogen bonds one of the phosphate oxygens, while the hydrophobic sides of the binding pocket are formed by a tryptophan sidechain (top) and a tyrosine sidechain (bottom).
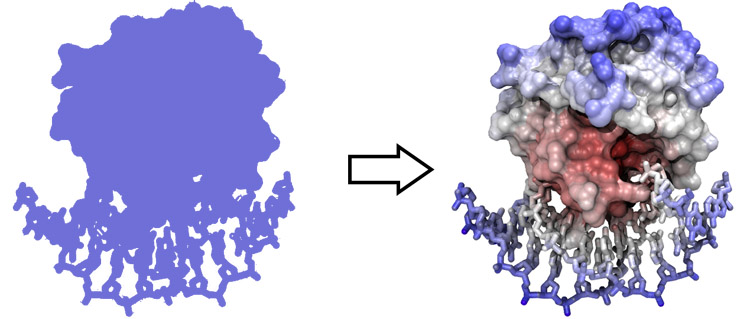
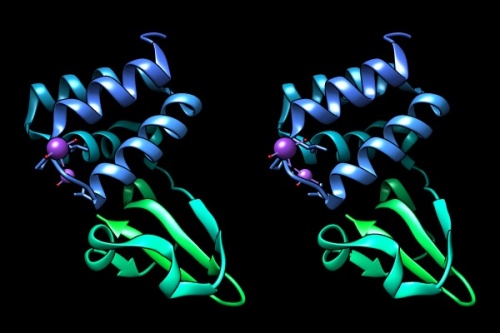
4IJE: Zaire ebolavirus VP35 interferon inhibitory domain mutant This simple structure is rendered as a ribbon model, with depth-cueing applied and a colour-ramp emphasizing the fold from N-C terminus.
Common problems
Some people get confused as to what they are "supposed" to see. You see two images of an object and you see them with each eye, i.e. in principle there are four images. The two central images (image L as seen with the left eye, image R as seen with the right eye) should overlap in the middle; these two images fuse in your visual system to create one 3D image. The two peripheral images still remain; since you don't concentrate on them, your visual system will edit them out of consciousness as you gain experience.
There are two situations which interfere with stereo vision. One such situation is if the images presented to your eye are of unequal size. This can happen if you are using glasses with significantly different correction for each eye - the lenses then have different magnifications. The other situation is if equivalent points of the images are vertically misaligned, i.e. one of the images is shifted up or down, or rotated. This can occur when your head is tilted relative to the image. Keep your head straight[1].
Images that are difficult to see in 3D are also images that are rendered differently for the left- and right view: non-aligned jagged edges, differing shadows or highlights disturb the stereo effect. To prevent this, try to apply visual effects judiciously. Chimera is quite good with it's rendering but e.g. specular highlights in some molecular viewers are quite inconsistent between left and right. Even in Chimera, hard shadows are not quite right, better to turn shadow effects off. (If you are a programmer, remember to write your code to move the camera location, don't rotate the object because that will incorrectly change shadowing.)
Of course, if you are practicing wall-eyed viewing, the so-called cross-eyed stereo images won't work for you. They look like the real thing, but the left-eye view is on the right-hand side and vice versa. You can tell that they are wrong when you achieve the image fusion because the 3-D effect seems to be all wrong. This is because the image becomes inverted in depth: near points appear far away and vice versa. If you are looking at a simple line drawing, you can't tell that this is happening. However if there are any secondary depth cues in the image, such as occlusions, shadows, highlights etc., they are in the wrong places, won't work to enhance the depth effect and just generally look weird. Once you are comfortable with stereo viewing, you can try this deliberately by selecting cross-eyed display in Chimera. Inverted space is very strange.
Notes
- ↑ That's the same effect as when you are watching a stereo movie with polarized glasses: If you have weak posture or a cute neighbour and slouch to the side, your eyes become misaligned relative to the separated images on the screen, your visual system tries to compensate, but over time you get a headache. This is how stereo-haters are made.
Further reading and resources
| Westheimer (2011) Three-dimensional displays and stereo vision. Proc Biol Sci 278:2241-8. (pmid: 21490023) |
|
[ PubMed ] [ DOI ] Procedures for three-dimensional image reconstruction that are based on the optical and neural apparatus of human stereoscopic vision have to be designed to work in conjunction with it. The principal methods of implementing stereo displays are described. Properties of the human visual system are outlined as they relate to depth discrimination capabilities and achieving optimal performance in stereo tasks. The concept of depth rendition is introduced to define the change in the parameters of three-dimensional configurations for cases in which the physical disposition of the stereo camera with respect to the viewed object differs from that of the observer's eyes. |
